Template FLEXIcontent - Part 2 : Fields Type
This tutorial is offered by NetAssoPro, you can find all components, modules and plugins for FLEXIcontent here
NOTE : This tutorial is actualy good, but we work on it to update it with new option introduce in stable version.
FLEXIcontent allows you to create custom fields for each type of content you want to use.
This allows us to force the user to enter different information in very specific areas that I will display as l please. I can also transform these fields in search criteria or filter... So with a little imagination, you can quickly make all the templates as you want and once again open doors that let Joomla close.
The available type's fields are : checkbox, checkbox image, date, email, file, image, radio buttons, radio image buttons, select, multiple select, text, textarea and weblink. It should be said straight away, I'm happy with that ^^
In addition to custom fields, FLEXIcontent also gives you access to additional features for each content:
- Versioning Management
- An integrated system of voting
- Bookmarks
- A counter hit
- Management of keywords
- Assigning multiple categories to a single content
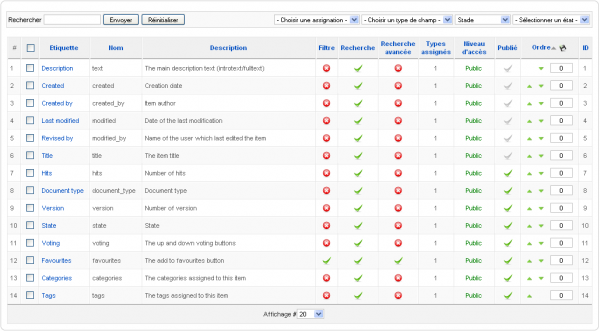
All features, that appear as fields, are automatically assigned to a content type when you create it, same as the database fields (title, description, author, creation date, modification date, publication status)
I will continue to create my template by setting some fields types and adding custom fields. This example is of course nothing concrete, he just intended to illustrate the various features.
Tutorial Summary
- Overview of FLEXIcontent's fields
- Fields Types
- Custom Fields and Plugins installation
- How to create our own fields
- Positioning fields in the template
Overview of FLEXIcontent's fields
In FLEXIcontent, you can associate a field to one or more types of content. Each custom field has its own options. In fact, the types of fields (textarea, checkbox, list ...) are generated through a specific plugin. So if you want, nothing prevent you to create your own field type.
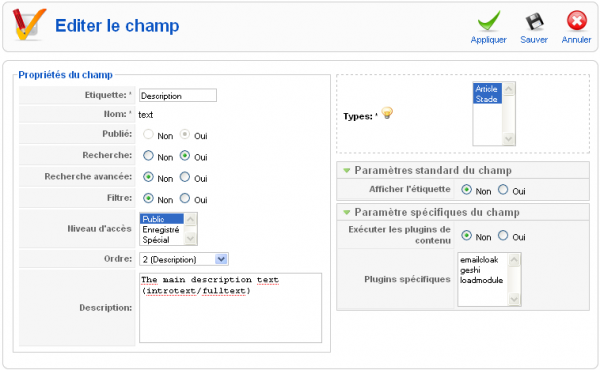
For each field types, there are some options that are common:
- Etiquette : is the name that will appear (or not) in front of your fields in the template. Be careful if you want to change the label of the description field and that you want to differentiate by type of content, it is preferable at this point to change the value directly into the parameters of the type in which an option is provided for this purpose.
- Nom : the name used to identify your fields, it is important to use only the characters AZ, az and 0-9 without spaces because it is the name that will allow us to reference our field in the template. By default when you create a field, FLEXIcontent calls it "fieldxx" I recommend you to change it.
- Publié : allow the activation or not of a field. Some fields (title, description, created, created by, last modified, revised by) publication can not be unpublish because they are necessary for the proper functioning of versioning. However there is a trick if you do not want them to appear when creating new content, just not to affect the fields to the content type in question and our problem is solved.
- Recherche : Indicates whether the contents of the fields will be indexed or not to search.
- Recherche Avancée : This function will be used in the 1.7 version of FLEXIcontent.
- Filtre: Indicates whether the fields will be displayed as a filter in the display mode of the content category. If you want to use this feature you must initially set the value to yes on the field to use as filter. Warning! only the fields with predefined values (Checkbox, Checkbox image, Select, Select Multiple, Radio, Radio Image) can be used as a filter. Then do not forget to activate the filters within the parameters of the category and select from the list the appropriate fields.
- Niveau d'accès: The level of access of a fields is related to basic levels of Joomla ACL.
- Ordre: Determines the display order of fields when entering content.
- Description: Specifies the user the instructions for entering the field. In the same way as for the label, if you want to learn different descriptions for the "description" field, you will need to fill in the parameters of the type.
- Types: Select here the types you want associated with your field (press Ctrl to select multiple types)
- Afficher l'étiquette: Allows you to enter a parameter that can be used in the template to see if it shows or not the field label.
- Préfixe et suffixe: Available in most areas (but not all). These two parameters allow you the ability to add value before and after the contents of your fields. You can add the € symbol such as a trailer if you want to display a currency field. They can also be used to add html code or even use them to implement a plugin (to see the last part of this tutorial)
- Plugins spécifique: This list shows all content plugins installed on your Joomla site, you can choose specific plugins in the list or leave blank to make the content compatible with any plugin. This feature is useful in some cases to avoid conflicts, multiple displays or reduce the load. Keep in mind that when the plugin is used on a field, will automatically run on all fields in the loop.
Fields Types
Some fields are automatically assigned when creating a new type, these are the types of fields FLEXIcontent.
Some are directly related to the Joomla core:
- Title: The title of your content
- Description: This is the content of your article in Joomla. If you want to make compatibility with Joomla content plugins, you do not forget to check in the settings of this box the option "Execute content plugins".
- Created: Content Creation Date.
- Created by: Author content.
- Last modified: Date of last modification of the content.
- Revised by: Name of user who last modified the contents.
- Hits: Number of times the content was view. (by default it has a suffix of information:"views")
- Document type: The type of content.
- Version: The version of the content.
- State: The state of publishing content.
For fields of date types, it is possible to change the display format in the parameters of the field through a list of predetermined values or create a custom display format using the PHP strftime parameters : strftime
Other fields correspond to very specific features of FLEXIcontent:
- Voting : A feature for rated from 1 to 5. Voting is symbolized by an image 25 × 75 (com_flexicontent / assets / images / star.gif) split into three images representing the actions: no selected, selected and hover. You can create your own image, then change the path in the settings fields to point the path to your file. So I realize my little image with balloons, it's more fun to assess the stades. You can also change the display size of the image which defaults to 16 pixels.
![]()
- Favourites : Allows to a registred user to bookmark this page.
![]()
- Categories : Stores the categories in which the contents are classified. An option allows to select the separator that will be shown later by frontend (vertical bar, line break, comma, space)
- Tags: Stores the tags where the contents is classified. An option allows to select the separator that will be shown later by frontend (vertical bar, line break, comma, space)
Custom Fields
As I said previously, FLEXIcontent offers many possibilities to customize the entry content and displays, through custom fields. I will now, while continuing my example of creating a template to present the stade of French football, we have different types of custom fields. I would not use the fields for each set of parameters available, but through the entire tutorial I will cover all the features available.
Remember for each field to select the types affected our type "Stade".
- Text :
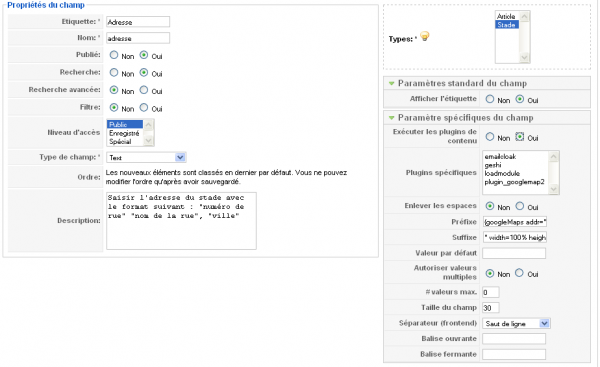
I'll start by adding my first custom field, I want to display the address of the stadium. But that's not all, I will use the address you entered to display the location of my satde using a Google Map.
First of all I installed and activated the latest version of GoogleMap plugin : (http://www.kksou.com/php-gtk2/Joomla-Gadgets/googleMaps-plugin.php#download).
I add my field with these following values :
I name the label and the field name "address", then I select my field type: "Text". I complete my description telling the user how he need to fill the content "Enter the address of the stadium with the following format: 'house number' 'street name', 'city'."
I want to run the plugin GoogleMap on this field, so I change the value of "Execute content plugins" indicating the value "yes."
I take the prefix and fill it with this , the beginning of the GoogleMap tag :
1 |
{googleMaps addr= "
|
1 |
"width = 100 height = 190 lang = fr mapType = G_HYBRID_MAP}
|
The address that I will enter later will be integrated directly as a parameter for my plugin.
Important ! So far it is not possible to use a plugin that uses the pipe character "|" in the settings because it generates a bug.
- Textarea
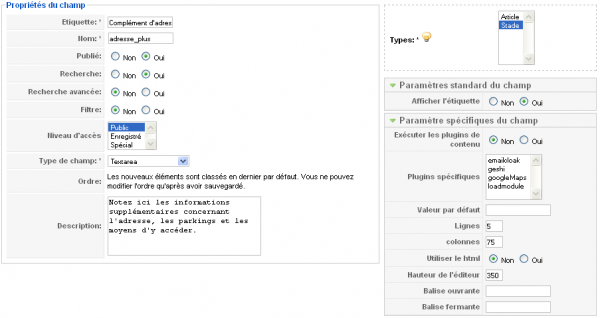
I will no add a area that will allow me to fill a address complement with these following values :
I decide to not activate the HTML editor and I reduce the area to 5 lines in order not to overload my entry page. (The area "Height of the publisher" refers only to the pixel height of the HTML editor)
- Date
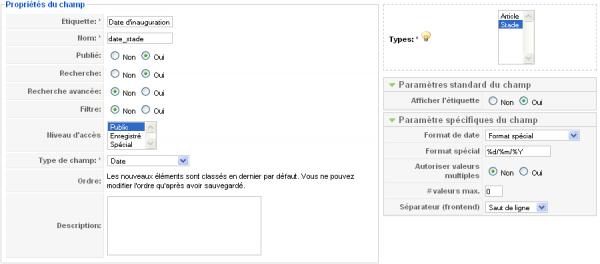
I will now add the field to record the date of the stadium opening. This field will allow me to select a date using a calendar that is displayed along side my fields.
I want to display a specific format that does not exist in the list, so I select "Custom Size" and I take my size, "%d/%m/%Y" to display a date which will look like this' 14/07/1979 '. I also disable multiple values.
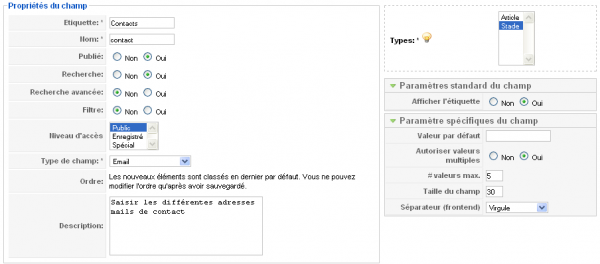
I will add a email area that will allow us to use multiple contact addresses
I name the field "contact'", I indicate instructions into the description. I will allow multiple values with a maximum of 5 contacts. I also decided to display the values in my template, separating by a comma. Beware, there is no control format when entering values, the user can enter what they want (anything other than email address). In the template, FLEXIcontent will simply add a "mailto:"
- weblink
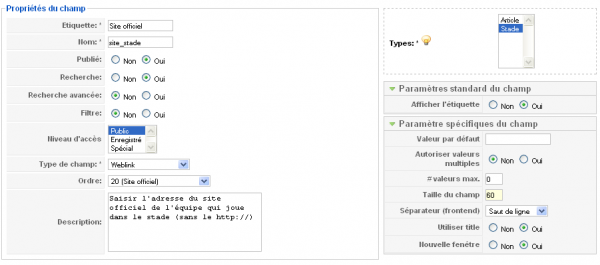
I want to display for each of my stadium, the name and the website of the official club playing on the lawn.
I named my field "site_stade" and I say, in the description, that we should not enter the "http://"in my address. (although we will see later that FLEXIcontent automatically manages this) I enlarged a bit the size of my field as an Internet address will take a little more room.
I also use the title of my link, instead of displaying the site address. This will allows me to show the name of the club rather than the name of the site.
Finally I do not want the user leaves my site if clicked link, so I sent in a new window.
- Image
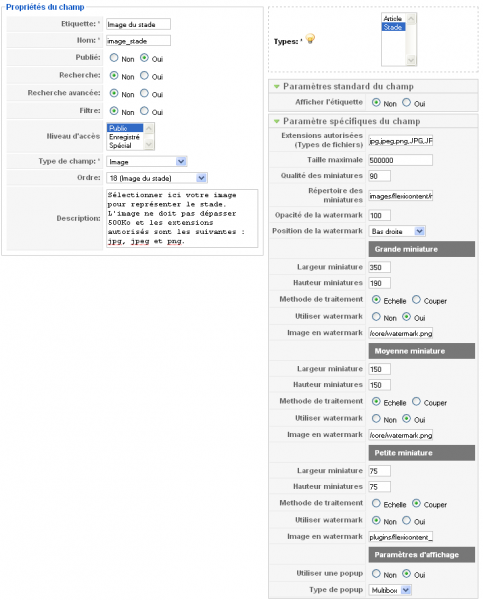
I will now add an image in order to view a picture of my stadium. I use the following parameters:
I named my field "image_stade" and then I fill the description by saying that I only allow jpg and png files. I decide to not display the field label, because I do not see the point for a image that is suppose to just illustrate my page.
I indicate the type extensions allowed, beware it's important to fill the extension in lower case and upper case. I limit my maximum file size to 500KB (500,000 bytes).
Thumbnail quality is the rate of compression, not working on a large amount of image I'd rather keep a good quality (a possible value -> 100)
I change the path to thumbnails directory in order to centralize all my images later in the same directory FLEXIcontent, I indicate: images/FLEXIcontent/thumbnails
We have the ability to handle a watermark (image embedded in the original image to ensure the rights of use), so I'll use it. I leave the opacity to 100% because I will directly manage the transparency in my image file. I position my watermark on the bottom right.
FLEXIcontent will automatically generate three types of thumbnails when uploading our image. So we can use later in our templates different sizes of images and therefore optimize load times.
For each of the sizes I set my maximum height and width. For large and medium thumbnail, I leave the image on the scale and I decided to embed my watermark that I store at the following location: images/FLEXIcontent/core/watermark.png.
For my little miniature I would not use the watermark to the small size of my image.
Finally it is also possible to automatically link my thumbnail with my original image through a popup that will appear automatically in my template. You can choose between the effect rockbox or multibox.
- File
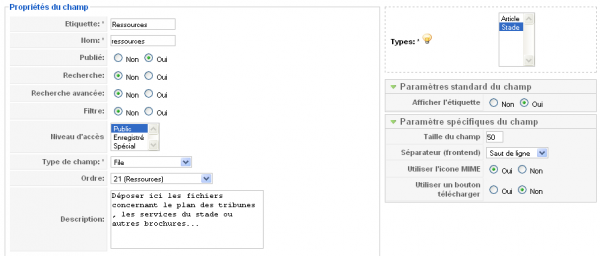
I now want to add an area where I could make available various resources on the stadium : plan forums, available services, brochures ... then I add my zone type "file" that I call "resources".
This area will allow me to add multiple files automatically. Choose the type of separator between files.
"Use MIME icon" will allow you to display on the frontend a small icon before the name of the file that will depend directly on the MIME type of the file.
"Use a download button", this allows you to display a "Download" button rather than a link to the file. The problem is that if I activate this feature, I could not manage a file and therefore I'm not interested.
- Select
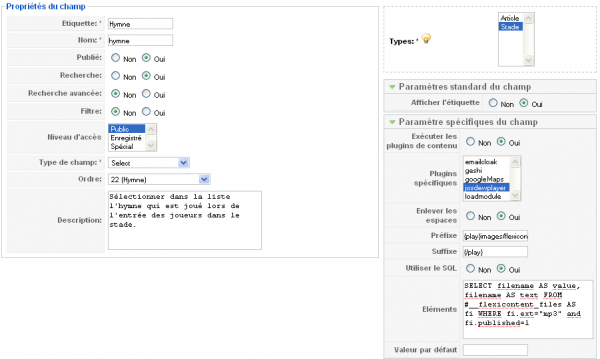
For each stade, I want to associate the music that is played at the entrance of the players. So I'll use a list that will directly dependent of the FLEXIcontent files. Before that, I make some changes in the general parameters of FLEXIcontent, I authorize the upload mp3 files and then I change the upload path "images/FLEXIcontent/files/". Then I install the plugin JosDewPlayer that will allows us to play MP3 files.
I named my field "hymne." I enable the execution of plugins on the content and I select only josdewplayer to optimize the operation. I also remove spaces in the names to avoid errors in the address of the file. To set up reading my file, I prefix information: {play}images/FLEXIcontent/files/ , then suffix {/ play}
I want to use the SQL to inform my list directly from files FLEXIcontent. I fill my querysql:
1 2 3 4 |
SELECT filename AS value, filename AS text FROM # __flexicontent_files AS fi WHERE fi.ext="mp3" AND fi.published=1 |
We must perform a query with two fields to show that it is mandatory to associate the alias "value" and "text" which is, of course, the value and the text of the list. Beaware that the default value that will be returned when displaying the template will be "text". I filter the files by selecting only the mp3 that are published.
- Select multiple
I wish to associate and display the various partners of the club. I set up a "select multiple" to be associated with the component of the banners in Joomla so you can select multiple partners. I named my field "partners"
I will use a plugin to display my banners, I do not forget to execute the content plugins and I select my plugin "Mos Banner 0.4" previously installed. I delete the spaces. I fill my tags prefix "{mosbanner: id =" and my suffix "}". I will bind my list to the list of Joomla banner published, so I turn on SQL and I use this query:
1 2 3 4 |
SELECT bid AS value, name AS text FROM # __banner AS ba WHERE ba.showBanner=1 ORDER BY ba.name |
Finallyn, I select the comma-separated values because it is the character used by my plugin.
We will see later that the result is not really one I want, and I have to create my own type of field (see next part)
- Checkbox, checkboxe image, radio buttons and radio image buttons
These fields are managed in the same way, apart from the fact that in some cases we may add images.
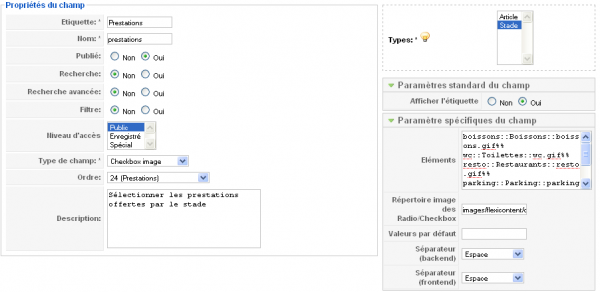
I will select the "Checkbox image" and fill in the items in the right format
"value::label::image%%", my values, "drinks:: Drinks::drinks.gif%% wc::Toilets::wc.gif%% restaurant::Restaurants::resto.gif%% parking::Parking::parking.gif%% smoking::No Smoking::smoke.gif "
Do not put the double percentage at the end of the list.
Then I change the path to my images' images/FLEXIcontent/core/ ". It's also possible to check by default qomz values, using the default values. you just need to fill the "values", separated by commas.
My custom fields is now complete.
Create our own field type
FLEXIcontent allows you to create your own field types, we can do a field with an incremental counter (+,-) or even a scroll to determine the values. I'll just present the possibilities because, for myself, I'll just make a copy of "select multiple" to transform the report that is currently in this format: [prefixe_plugin] [etiquette1] [suffixe_plugin] [separator] [prefixe_plugin] [etiquette2] [suffixe_plugin] [separator] ... in this new format I want: [prefixe_plugin] [value1] [separator] [value2] [separator] ... [suffixe_plugin]
A field type in FLEXIcontent is actually a plugin, plugins are automatically installed in the plugins/flexicontent_fields/ and consist of two files [name_plugin].xml and [name_plugin].php and the associated language files.
The XML file
I make a copy of the original selectmultiple.xml I rename it in selectmultiple.php. This is a standard file for Joomla installation, there are first the legal notices and the description, so I just change the name of my plugin to distinguish it from the original plugin, I added my name at the author tag and I will update the version:
1 2 3 4 5 6 7 8 9 10 11 |
=?>"1.0" encoding="utf-8"PHP--> |
1
2
3
= "selectmultiplead">selectmultiplead.php
</files>
Then we find the parameters of the plugin. I add two parameters, the first I call "postext_mode" that will allow me to say if we use the prefix and suffix of each value, or only the beginning and end of all values. My second parameter "value_mode" to determine if I display my values or my label.
1
2
3
4
5
6
7
8
9
10
11
12
13
14
15
16
17
18
19
20
21
22
23
24
25
26
27
28
29
30
31
32
33
34
35
36
37
38
39
40
41
42
43
="standard">
="display_label" type="radio" default="1" label="FLEXI_FIELD_DISPLAY_LABEL" description="FLEXI_FIELD_DISPLAY_LABEL_DESC">
"0">No
"1">Yes
</param>
</params>
="group-selectmultiplead" addpath="/administrator/components/com_flexicontent/elements">
="trigger_onprepare_content" type="radio" default="0" label="FLEXI_ENABLE_TRIGGER_ONPREPARECONTENT_EVENT" description="FLEXI_ENABLE_TRIGGER_ONPREPARECONTENT_EVENT_DESC">
"0">FLEXI_NO
"1">FLEXI_YES
</param>
="plugins" type="pluginlist" label="FLEXI_FIELD_CHOOSE_SPECIFIC_PLUGINS" description="FLEXI_FIELD_CHOOSE_SPECIFIC_PLUGINS_DESC" />
="remove_space" type="radio" default="0" label="FLEXI_REMOVE_SPACE" description="FLEXI_REMOVE_SPACE_DESC">
"0">FLEXI_NO
"1">FLEXI_YES
</param>
="pretext" type="text" default="" label="FLEXI_FIELD_PREFIX_TEXT" description="FLEXI_FIELD_PREFIX_TEXT_DESC" />
="posttext" type="text" default="" label="FLEXI_FIELD_SUFFIX_TEXT" description="FLEXI_FIELD_SUFFIX_TEXT_DESC" />
="postext_mode" type="radio" default="0" label="FLEXI_FIELD_POSTEXT_MODE" description="FLEXI_FIELD_POSTEXT_MODE_DESC">
"0">FLEXI_NO
"1">FLEXI_YES
</param>
="sql_mode" type="radio" default="0" label="FLEXI_FIELD_SQL_MODE" description="FLEXI_FIELD_SQL_MODE_DESC">
"0">FLEXI_NO
"1">FLEXI_YES
</param>
="field_elements" type="textarea" default="" rows="5" cols="25" label="FLEXI_FIELD_ELEMENTS" description="FLEXI_FIELD_ELEMENTS_DESC" />
="default_values" type="text" default="" label="FLEXI_FIELD_DEFAULT_VALUES" description="FLEXI_FIELD_DEFAULT_VALUES_DESC" />
="size" type="text" default="6" size="2" label="FLEXI_FIELD_SIZE" description="FLEXI_FIELD_SIZE_DESC" />
="value_mode" type="radio" default="0" label="FLEXI_FIELD_VALUE_MODE" description="FLEXI_FIELD_VALUE_MODE_DESC">
"0">FLEXI_FIELD_LABEL
"1">FLEXI_FIELD_VALUE
</param>
="separatorf" type="list" default="1" label="FLEXI_FIELD_SEPARATOR_FRONTEND" description="FLEXI_FIELD_SEPARATOR_FRONTEND_DESC">
"0">FLEXI_SPACE
"1">FLEXI_LINE_BREAK
"2">FLEXI_PIPE
"3">FLEXI_COMMA
"4">FLEXI_FIELD_TAG_CUSTOM
</param>
="opentag" type="text" default="" label="FLEXI_FIELD_TAG_OPEN" description="FLEXI_FIELD_TAG_OPEN_DESC" />
="closetag" type="text" default="" label="FLEXI_FIELD_TAG_CLOSE" description="FLEXI_FIELD_TAG_CLOSE_DESC" />
</params>
1
2
3
4
5
= "en-GB">en-GB.plg_flexicontent_fields_selectmultiplead.ini
= "fr-FR">fr-FR.plg_flexicontent_fields_selectmultiplead.ini
</languages>
</install>
The PHP file
This file is a class consisting of 5 events:
- onDisplayField: Display the field in the input content
- onDisplayFieldValue: field formatted for display on frontend
- onBeforeSaveField: Format the field value before it is registered
- onAfterSaveField: Not yet used for the moment, but in the near future it will allow interactions with other components.
- onDisplayFilter: Display filters in the view of the template class. By default it lists.
For my part I will only change the event onDisplayFieldValue to add conditions that depend on my 2 new parameters.I start by changing the name of my class and my builder that I call: plgFlexicontent_fieldsSelectmultiplead.And then in the first line of each event, I change the code as follows:
1


if ($field->field_type != 'selectmultiplead') return;


Then I add the conditions in my code and also take off the " " in my separators for not create bug with my plugin.


1
2
3
4
5
6
7
8
9
10
11
12
13
14
15
16
17
18
19
20
21
22
23
24
25
26
27
28
29
30
31
32
33
34
35
36
37
38
39
40
41
42
43
44
45
46
47
48
49
50
51
52
53
54
55
56
57
58
59
60
61
62
63
64
65
66
67
68
69
70
71
72
73
74
75
76
77
78
79
80
81
82
83
84
85
86
87
88
89
90
91
92
93
94
95
96
97
98
99
100
101
102
103
104
105
106
107
108
109
110


function onDisplayFieldValue(&$field, $item, $values = null, $prop = 'display')
 {
  // execute the code only if the field type match the plugin type
  if ($field->field_type != 'selectmultiplead') return;
  $values = $values ? $values : $field->value ;
  // some parameter shortcuts
  $remove_space = $field->parameters->get('remove_space', 0) ;
  $pretext = $field->parameters->get('pretext', '') ;
  $posttext = $field->parameters->get('posttext', '') ;
  $field_elements = $field->parameters->get('field_elements', '') ;
  $sql_mode = $field->parameters->get('sql_mode', 0) ;
  $separatorf = $field->parameters->get('separatorf') ;
  $opentag = $field->parameters->get('opentag', '') ;
  $closetag = $field->parameters->get('closetag', '') ;

  // j'ajoute mes deux nouveaux paramètres
  $value_mode = $field->parameters->get('value_mode', '') ;
  $postext_mode = $field->parameters->get('postext_mode', '') ;

  // je retire dans les séparateurs le
  switch ($separatorf) {
   case 0:
    $separatorf = ' ';
    break;
   case 1:
    $separatorf = '
';
    break;
   case 2:
    $separatorf = '|';
    break;
   case 3:
    $separatorf = ',';
    break;
   case 4:
    $separatorf = $closetag . $opentag;
    break;
  default:
   $separatorf = ' ';
   break;
  }
  if ($pretext) {
   $pretext = $remove_space ? $pretext : $pretext . ' ';
  }
  if ($posttext) {
   $posttext = $remove_space ? $posttext : ' ' . $posttext;
  }
  if ($sql_mode) { // SQL mode
   $db = &JFactory::getDBO();

   $query = preg_match('#^select#i', $field_elements) ? $field_elements : '';
   $db->setQuery($query);
   $results = $db->loadObjectList();

   if (!$results) {
    $field-> {$prop} = '';
   } else {
    $display = array();
    foreach($results as $result) {
     for($n = 0, $c = count($values); $n < $c; $n++) {
      if ($result->value == $values[$n]) {
       // selon qu'on décide d'afficher la valeur ou l'étiquette
       if ($value_mode == 0) {
        $thevalue = $result->text ;
       } else {
        $thevalue = $result->value ;
       }
       // selon qu'on décide d'utiliser le plugin pour toutes les valeurs ou pour l'ensemble des valeurs
       if ($postext_mode == 0) {
        $display[] = $pretext . $thevalue . $posttext;
       } else {
        $display[] = $thevalue ;
       }
      }
     }
    }
   }
  } else { // Elements mode
   // initialise property
   $listelements = explode("%% ", $field_elements);
   $listarrays = array();
   foreach ($listelements as $listelement) {
    $listarrays[] = explode("::", $listelement);
   }
   $display = array();
   foreach ($listarrays as $listarray) {
    for($n = 0, $c = count($values); $n < $c; $n++) {
     if ($values[$n] == $listarray[0]) {
      // selon qu'on décide d'afficher la valeur ou l'étiquette
      if ($value_mode == 0) {
       $thevalue = $listarray[1];
      } else {
       $thevalue = $listarray[0];
      }
      // selon qu'on décide d'utiliser le plugin pour toutes les valeurs ou pour l'ensemble des valeurs
      if ($postext_mode == 0) {
       $display[] = $pretext . $thevalue . $posttext;
      } else {
       $display[] = $thevalue ;
      }
     }
    }
   }
  }
  $field-> {$prop} = implode($separatorf, $display);
  // selon qu'on décide d'utiliser le plugin pour toutes les valeurs ou pour l'ensemble des valeurs
  if ($postext_mode == 1) {
   $field-> {$prop} = $pretext . $field-> {$prop} . $posttext;
  }
  $field-> {$prop} = $opentag . $field-> {$prop} . $closetag;
 }
So I will now change my type of field for my "partners" field to assign my new type: "Select Multiple Advanced." In terms of options for "Type of information to be displayed (frontend)," I select "value" and for "Multi suffix, prefix" Leave it on "no".
Positioning fields in the template
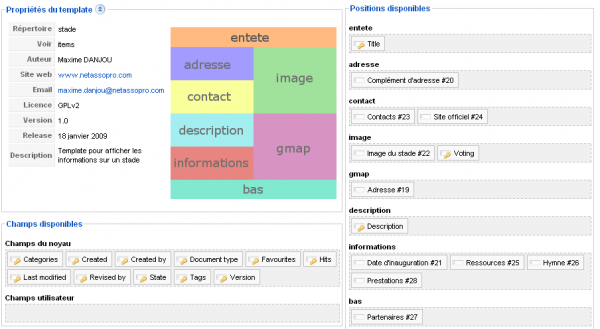
In this final chapter of the second part of the tutorial to create templates in FLEXIcontent, I'll show you how to position our fields in its own template via the interface of the back office. I go to the section Template FLEXIcontent then at the line of my template "Stade" I click the icon associated with the Life Item. The positioning of the fields is then a simple drag / drop. I set up my fields as follows:
In a future version of FLEXIcontent it will also create their own areas directly via the GUI... interesting. I also show in Part 4 of this tutorial how to insert fixed fields directly into the template. It all for now, in the next part I will discuss the part of the entry of content through our custom type. This will give you an overview of the arrangement of the various fields and their entry mode.


