Template FLEXIcontent - Part 1 : The structure

This tutorial is offered by NetAssoPro, you can find all components, modules and plugins for FLEXIcontent here
NOTE : This tutorial is actualy good, but we work on it to update it with new option introduce in stable version.
For this example, I will assume that we want to create content to be able to reference some football stadiums, and yes I'm a football fan.
We have for objective to display the following fields :
- Text & Textarea: the coordinates of the stadium
- Date: the date of construction
- Image: a stadium's picture
- File: the stand's plan
- Select: the official anthem at the entrance of the players
- Select Multiple: list of partners
- Text + plugin: a google map to locate it
- Checkbox images: a field to display the stade's services
- Weblink: a link to the club's official website
- Email: email address to the official contact ...
Of course you can adapt this example to your needs !
- Part 1 : The new template structure
- Part 2 : Fields Type
- Part 3 : Entering data into content
- Part 4 : The content's template
The new template structure
Initial Parameters
Before going into the details of creating the template, you must first make sure to set correctly FLEXIcontent. I add a root category to the default settings that I called "Stades". I then add my type with the default settings that I called "Stade".
The template's path is : /components/com_flexicontent/templates/
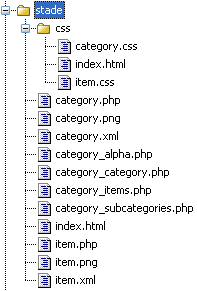
So I will create here a new folder I call "stade". Then I create blank files in order to create the same tree (see above), which we will fill in proportion to our state of progress.
Item.xml
It's this file who will determine the areas and parameters of the content's template.
<metadata>
 <author>Maxime DANJOU</author>
 <website>www.netassopro.com</website>
 <email>maxime.danjou @netassopro.com</email>
 <license>GPLv2</license>
 <version>1.0</version>
 <release>18 janvier 2009</release>
 <description>Template pour afficher les informations sur un stade</description></metadata>
1 2 3 4 |
<option value="0">No</option> <option value="1">Yes</option> </params> |
I determine the areas which I can add some différents fields.
1 2 3 4 5 6 7 8 9 10 |
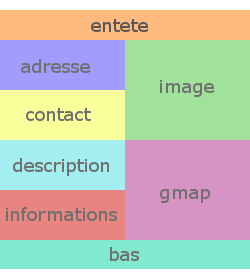
<fieldgroups> <group>entete</group> <group>adresse</group> <group>contact</group> <group>image</group> <group>gmap</group> <group>description</group> <group>informations</group> <group>bas</group> </fieldgroups> |
In the last part of my file, I indicate the path of the css file that will be used in my template. If I needed, I could also upload files Javascript ...
1 2 3 4 5 |
<cssitem> <file>css/item.css</file> </cssitem> <jsitem> </jsitem> |
category.xml
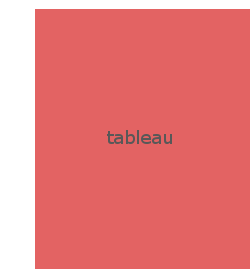
It's this file who will determine the areas and settings of the template for displaying a list of contents.I choose to view "stades" in list into a table (I would do another tutorial to show the display in blog). The beginning of the file is identical to item.xml and the rest is not very complicated because all fields will be in a table, so there is only one area. Also, I do not have to add parameters:
1 2 3 4 5 6 7 8 9 |
</params> <fieldgroups> <group>tableau</group> </fieldgroups> <csscategory> <file>css/category.css</file> </csscategory> <jscategory> </jscategory> |
category.png and item.png
These two files are just meant to show the user how areas are positioned in the template. I create two images of 250 × 280 to properly represent my template.
This file is the template that will display the content, in a first part we will inform only the html code in order to determine our areas.
1
2
3
4
5
6
7
8
9
10
11
12
13
14
15
16
17
18
19
20
21
22
23


<?php
defined( '_JEXEC' ) or die( 'Restricted access' );
// on définit ici le nom du template
$tmpl = $this->tmpl;
?>
<div id="stade_contenu">
 <div id="stade_entete">
 </div>
 <div id="stade_adresse">
 </div>
 <div id="stade_contact">
 </div>
 <div id="stade_image">
 </div>
 <div id="stade_description">
 </div>
 <div id="stade_informations">
 </div>
 <div id="stade_gmap">
 </div>
 <div id="stade_bas">
 </div>
</div
category.php, category_alpha.php, category_category.php, category_category.php, category_items.php, category_subcategory.php
I will use all this files to show my "stades" in a list, here is the usefulness of each.
- catetegory.php: main template file is called by FLEXIcontent, it shows only the main title bar icon (print, pdf, mail) and loads the other files in the template
- category_alpha.php: it displays an alphanumeric index that allows you to easily find content in a list according to its first character
- category_category.php: This file displays information about the category that is displayed (image and description)
- category_items.php: lists the contents as a table or blog (in my case it will be a table)
- category_subcategory.php: displays the list of subcategories of the category being displayed with the option to show the number of content
I'll just make a single copy of the original files contained in the template "default", I will detail in Part 4 of my tutorial.
css/category.css, css/item.css
When loading a template, his css file is loaded automatically, category.css for displaying in category and item.css for displaying a single content. I leave the category.css file empty and I fill item.css very simply as follows:
1 2 3 4 5 6 7 8 9 10 11 12 13 14 15 16 17 18 19 20 21 22 23 24 25 26 27 28 29 30 31 32 33 34 35 36 37 38 39 40 41 42 43 44 45 46 47 |
div.stade_contenu{ width:740px; overflow:hidden; } div.stade_entete{ width:100%; height:30px; overflow:hidden; } div.stade_adresse{ width:50%; height:100px; overflow:hidden; } div.stade_contact{ width:50%; height:100px; overflow:hidden; } div.stade_image{ float:left; width:50%; height:200px; overflow:hidden; } div.stade_description{ width:50%; height:100px; overflow:hidden; } div.stade_informations{ width:50%; height:100px; overflow:hidden; } div.stade_gmap{ float:left; width:50%; height:200px; overflow:hidden; } div.stade_bas{ clear:both; width:100%; height:30px; overflow:hidden; } |
Setting up the template
In order to install my new template, I just copy the directory "stade" and all its contents, that I create previously, on my site in the following directory:
components / com_flexicontent / templates
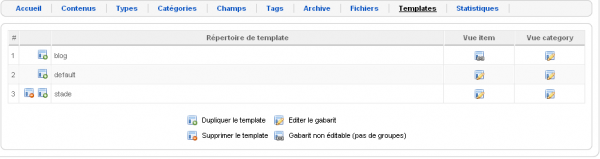
Once the files are copied, I can go to the back office of FLEXIcontent in the templates section to verify if my template is correctly installed.

Additional configuration
To complete the installation and the configuration of our new template, I now assign it to my category and my type.
So I'm going in the back office FLEXIcontent, I click on "type" and then "stade". We will now assign a default template for each content which will be created with the"stade", then I change the value of template's content choosing from the list "stade". I note that I have the option "Settings templates, parameters: stade" that turns on and I find the option to display the GoogleMap that appears, its value is at false, I switch it to true.
Now I need to assign my template to display a view category, always in the back office, I head into "categories" and then I return to my editing class stade. In the "Standard Settings", I select "stade" in the option "template category", then I save the configuration. In my setup, there is no option that is assign to this template.
To enhance a little bit the tutorial, I will also add sub-categories that I call "East", "North and Center", "West" and "South". When creating each of thess categories, I select the option "Copy all parameters: stades" and "Parent Category: stades" as well.

That all for this first tutorial, next tutorial here : Part 2 : The field's types available to create your template
I hope you enjoyed this tutorial, feel free to discussing it in the forum, in the appropiate section.